Custom Exports with JavaScript
Intro
ancoreShare provides a JavaScript API to access the generated report file. This way you can export your reports for example to a custom URL, upload them on an FTP server, or anything else you can think of using JavaScript.
If you've made it this far and JavaScript rings a bell, make sure to check out ancoreScript! It's included for free with ancoreShare and offers a full-featured IDE within your Qlik sheet. Whether you're using low-code templates or diving into full custom JavaScript, ancoreScript unlocks endless possibilities to enhance your Qlik experience. Visit the ancoreScript section to learn more.
To enable custom export, perform the following steps:
Access export option
- On your Sense sheet, select the ancoreShare button for which you want to specify JavaScript export settings.
- On the properties panel, click Export Settings > Custom Export.
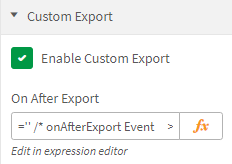
- Select the Enable Custom Export option.
Configure custom export
In the On After Export field, click fx to use the expression editor and enter your JavaScript code that will be executed on after the event of generating the report file there. You will already find several examples and comments in this section to support you.
Sample Code
Here's a sample code that you can use to send the report to a custom URL. In this sample, we have sent the exported file to Atlassian using a REST API.
/* Debug your code: Open browser developer console (F12): */
//debugger

//Upload file via REST Service
const url = ""; // URL to REST Service
const user = "";
const password = "";

let actionData = new FormData();
actionData.append("file", file, filename);
actionData.append("comment", subject);

$.ajax({
  type: "POST",
  url: url,
  data: actionData,
  processData: false,
  headers: {
    "Authorization": "Basic " + btoa(user + ":" + password),
    "X-Atlassian-Token": "no-check",
    "cache-control": "no-cache"
  },
  contentType: false,
  cache: false,
  success: function (data, status, response) {
    webix.message({type: "success", text: filename + "<br>Custom Upload succeeded."});
  },
  error: function (response) {
    webix.message({expire: -1, type: "error", text: filename + " Custom Upload failed.<br>" + (response.responseText || response.statusText)});
  }
});
Don't forget to update the variables as per your requirement.